Most people think prompt engineering is easy: just type in what you need, maybe toss in an example or two, and let the AI handle the rest. That’s how basic prompt engineering works and for many use cases it can yield acceptable results.
But basic prompts often fall apart when you need consistency, accuracy, or scale. That’s where advanced prompt engineering comes in.
It’s not just about giving instructions. It’s about knowing how to ask, what to include, and when to break things down. **You have to speak the model’s language**, guide it step-by-step, and sometimes split a task into multiple prompts to get the job done.
You also need to manage context, because API calls are stateless.
Advanced prompt engineering means treating the model like a tool inside a bigger system that may include external tools, often built using [LLM frameworks](/blog/llm-frameworks/). It’s not just about writing a prompt, but about designing how that prompt fits into your app or workflow, what we might broadly call [LLM integration](/blog/llm-integration/). You define roles, shape behavior, and build chains of prompts that work together to solve complex tasks.
**But LLMs are non-deterministic**, so the same input can return different outputs each time. To get real, repeatable results, you need to understand how the model behaves, version your prompts, and track what’s changing.
That’s not so easy with the current state-of-the-art [LLM tools](/blog/llm-tools/), so we built our own prompt engineering framework, [Lilypad](/docs/lilypad), to make it easy to track every change, not just to the prompt text, but also to the code that calls the model.
This includes LLM settings, the code structure, and any data transformations involved, so you can version, compare, and optimize model outputs like a real engineering workflow.
In this article we describe advanced prompt engineering techniques that we found to be highly useful in our own app development:
* [Few-Shot Prompting](#1-few-shot-prompting)
* [Rephrase and Respond](#2-rephrase-and-respond-rar)
* [Chain of Thought](#3-chain-of-thought-cot)
* [Self-Ask](#4-self-ask-prompt)
* [Tree of Thought](#5-tree-of-thought-tot)
* [Chain of Verification](#6-chain-of-verification-cov)
* [Self-Consistency](#7-self-consistency)
At the end, we’ll also show how our LLM engineering platform [Lilypad’s experimentation framework](#why-prompts-alone-aren’t-enough) makes iterating and testing your prompts easy and why that matters, since advanced prompt techniques alone aren’t guaranteed solutions but instead are hypotheses about how to guide the model toward better results.
## 7 Highly Useful Prompt Engineering Techniques
### 1. Few-Shot Prompting
Few-shot prompting teaches the model *how* to respond by giving it a few examples first (as opposed to no examples, like in zero-shot prompting). Instead of just asking a question and hoping for the best, you show the model a pattern to follow.
This technique is especially useful when the task is a little unusual, or when you want the outputs to be consistent and predictable.
By seeing a couple of examples, the model picks up on the structure, style, and logic you want, even if you never spell out the rules (which is a good example of in-context learning).
In the example below, we’re training the model to classify whether a situation shows "good teamwork" or "poor teamwork" by giving two examples before asking it to evaluate a new one.
Example:
```
Classify the following scenarios as "Good Teamwork" or "Poor Teamwork."
Example 1:
Situation: "During a group project, everyone shares their ideas, listens respectfully, and agrees on a plan together."
Answer: Good Teamwork
Example 2:
Situation: "One team member ignores everyone else’s suggestions and makes all the decisions alone."
Answer: Poor Teamwork
Now classify:
Situation: "The group divides tasks fairly, helps each other when needed, and celebrates success together."
Answer:
```
Response:
```
Answer: Good Teamwork
```
### 2. Rephrase and Respond (RaR)
RaR gets the model to think through a problem step-by-step, where you first ask it to rephrase and expand on a question before providing its response.
This allows the model to better understand and clarify the original query, especially if the prompt is vague or lacks detail.
In the example below, we start with a rather brief and unclear prompt. By using RaR, the model rephrases the question before responding.
Example:
```
A light is turned on. Bella toggles the switch. Carlos toggles the switch. Is the light still on? Toggle means change from on to off or off to on. Rephrase and expand the question, and respond.
```
Response:
```
A light is initially in the "on" position. Bella comes along and toggles the switch, changing the state of the light. Afterward, Carlos also toggles the switch. Following these two actions, is the light still on?
Let’s walk through it step-by-step:
1. Initial State: The light starts in the "on" position.
2. Bella Toggles the Switch: Toggling changes the light from "on" to "off."
3. Carlos Toggles the Switch: Carlos toggles it again, changing it from "off" back to "on."
Therefore, after both Bella and Carlos have toggled the switch, the light is once again in the "on" position.
```
You can also see a version of this [RaR prompt in Python](/docs/v1/guides/prompt-engineering/text-based/rephrase-and-respond) in our code tutorials.
### 3. Chain of Thought (CoT)
Chain of Thought prompting encourages the model to break a problem down into smaller, logical steps for separate consideration rather than just providing the answer immediately.
This mirrors how a human might tackle a complex problem, and is effective for tasks requiring critical thinking, like math, reasoning tasks, and problem-solving scenarios.
You’re basically asking the model to think aloud and explain each step of the process leading to the final answer.
Example:
```
Liam has 40 marbles. He gives 7 marbles each to 4 of his friends. How many marbles does he have left? Let's think step by step.
```
Response:
```
First, let’s figure out how many marbles Liam gave away in total:
Marbles given to one friend = 7
Number of friends = 4
Total marbles given = 7 × 4 = 28
Now, let’s subtract the total marbles given from Liam’s original amount:
Liam started with 40 marbles
He gave away 28 marbles
Marbles left = 40 - 28 = 12
So, Liam has 12 marbles left after giving marbles to his friends.
```
You can also check out our code tutorial for creating both zero- and few-shot variants of [CoT prompts](/docs/v1/guides/prompt-engineering/text-based/chain-of-thought) using Mirascope.
### 4. Self-Ask Prompt
This technique pushes the model to slow down and think critically by asking itself clarifying questions, and answering them, before jumping to a final conclusion.
Self-Ask is especially useful for messy, complicated, or open-ended questions, forcing the model to break down the problem and cover all the important angles.
While CoT walks the model through a solution step-by-step, Self-Ask goes a step further: it trains the model to spot confusion, fill in missing details, and sharpen its reasoning process before giving an answer.
Example:
```
Using the Self-Ask method, when is peak fall foliage in the state where ZIP code 80302 is located? If follow-up questions are needed, please ask and answer them before providing the final answer.
```
Response:
```
Are follow-up questions needed here: Yes.
Follow-up question: Which state is ZIP code 80302 located in?
Intermediate answer: ZIP code 80302 is in Colorado.
Follow-up question: When is peak fall foliage in Colorado?
Intermediate answer: Peak fall foliage in Colorado typically occurs from late September to early October.
Final Answer: Peak fall foliage in the state where ZIP code 80302 is located (Colorado) typically happens from late September to early October.
```
Our [self-ask prompt coding recipe](/docs/v1/guides/prompt-engineering/text-based/self-ask) shows you how to implement both basic and enhanced (with dynamic example selection) versions.
### 5. Tree-of-Thought (ToT)
A ToT prompt pushes the model to think wide before it thinks deep. Instead of charging down a single path, the model explores multiple possible solutions or reasoning trails to summarize for a problem.
ToT forces the model to step back, brainstorm different approaches, and then weigh the pros and cons of each before choosing the best path forward. It taps into the model’s real problem-solving abilities, not just its ability to guess fast.
The method breaks down into three key moves:
1. Brainstorm multiple ways to tackle the problem.
2. Judge each option, weighing strengths and weaknesses.
3. Toss out the weaker ideas and double down on the strongest one.
Example:
```
Create a new meal kit product aimed at busy college students. Generate at least three different product concepts, evaluating the pros and cons of each, and then recommend the best concept based on your analysis.
```
Response:
```
Concept 1: 5-Minute Microwave Meals
Pros: Extremely quick to prepare, appeals to students with tight schedules. Minimal cooking skills required. Affordable to produce at scale.
Cons: Limited nutritional value compared to fresh meals. Could become repetitive. May not appeal to students who want healthier options.
Concept 2: Build-Your-Own Fresh Bowls
Pros: Fresh ingredients that students can mix and match (grains, proteins, veggies, sauces). Healthier and customizable. Appeals to health-conscious students.
Cons: Slightly more prep time required (~10-15 minutes). Higher cost due to fresh ingredients and refrigeration needs. Risk of food waste if not used quickly.
Concept 3: Meal Prep Starter Packs
Pros: Provides students with basic pre-portioned ingredients and simple recipes for 3-4 meals. Teaches basic cooking skills. Appeals to students looking for budget-friendly, homemade meals.
Cons: Requires more effort than grab-and-go options. Might be intimidating for complete beginners. Shelf life depends on ingredients included.
Final Conclusion:
After weighing the options, the Build-Your-Own Fresh Bowls concept seems like the best fit. It strikes a balance between convenience, health, and customization, appealing to a wide range of busy but health-conscious students who still want some control over their meals.
```
### 6. Chain of Verification (CoV)
Chain of Verification takes LLM accuracy to the next level by building in a self-check process.
Here’s how it works: after the model gives its first answer, it’s immediately asked to come up with a set of verification questions based on the key facts it used. These questions aren’t random. They’re designed to double-check whether the important parts of the answer are actually true and relevant.
The model then answers each verification question separately, basically fact-checking itself. Based on those fact-checks, it revisits its original answer, fixes any mistakes, and produces a final, cleaner version.
Unlike techniques that just try to reason better during the first pass, CoV is all about going back after the fact, picking apart the response, and making sure every claim holds up. It’s a second layer of defense, and it can massively boost reliability when accuracy really matters.
Example:
```
List five famous explorers and the major discovery or achievement they are best known for. Please make sure that all the facts are verified correctly by generating and answering verification questions for each explorer's achievement. After the verification process, update the list with any necessary corrections. Accuracy is very important.
```
Output:
```
Preliminary List of Explorers and Their Achievements:
- Christopher Columbus: Discovery of the Americas (1492)
- Ferdinand Magellan: First circumnavigation of the globe
- Marco Polo: Travels to China and documentation of the Silk Road
- Neil Armstrong: First human to walk on the Moon
- Roald Amundsen: First to reach the South Pole
Verification Questions
1. Christopher Columbus:
Question: Did Columbus discover the Americas in 1492 during his voyage under the Spanish crown?
Expected Answer: Yes, although indigenous peoples already lived there, Columbus's 1492 voyage led to widespread European awareness of the American continents.
2. Ferdinand Magellan:
Question: Was Magellan the leader of the first expedition to circumnavigate the globe, even though he did not survive the entire journey?
Expected Answer: Yes, Magellan initiated the expedition, but he was killed in the Philippines; his crew completed the circumnavigation.
3. Marco Polo:
Question: Is Marco Polo best known for his travels to China and his detailed writings about the Silk Road and the Yuan Dynasty?
Expected Answer: Yes, Marco Polo’s accounts provided Europeans with one of the earliest comprehensive looks into East Asia.
4. Neil Armstrong:
Question: Was Neil Armstrong the first human to walk on the Moon during the Apollo 11 mission in 1969?
Expected Answer: Yes, Armstrong was the first person to step onto the lunar surface on July 20, 1969.
5. Roald Amundsen:
Question: Did Roald Amundsen lead the first successful expedition to reach the South Pole in 1911?
Expected Answer: Yes, Amundsen reached the South Pole on December 14, 1911, ahead of Robert Falcon Scott’s team.
Verified List of Explorers and Their Achievements:
- Christopher Columbus – Initiated European discovery of the Americas (1492)
- Ferdinand Magellan – Led the first circumnavigation of the globe
- Marco Polo – Documented travels to China and the Silk Road
- Neil Armstrong – First human to walk on the Moon (1969)
- Roald Amundsen – First to reach the South Pole (1911)
```
See our [coding tutorial](/docs/v1/guides/prompt-engineering/chaining-based/chain-of-verification) for a complete example of building a CoV prompt using Python.
### 7. Self-Consistency
Self-Consistency is a simple but impressive technique: you have the model generate multiple answers using Chain of Thought reasoning, then pick the answer that shows up the most.
This method boosts accuracy and reliability, especially for tricky tasks like math problems or anything that needs careful step-by-step logic.
Here’s how it works:
1. The model creates several full reasoning paths for the same question.
2. Instead of trusting a single output, it checks which answer shows up most often, and picks that one. The idea is that while any single answer might go off track, the most consistent answer across multiple runs is usually the right one.
Example:
```
Liam had 45 marbles. He gave 7 marbles to each of his 4 friends. How many marbles does he have left? Please solve this problem by thinking step by step. Generate multiple high-quality answers using different approaches or considerations. After generating several responses, select the most frequent answer and explain why it is the best choice.
```
Response:
```
Step-by-step analysis:
Approach 1: Direct Calculation Method
1. Liam starts with 45 marbles.
2. He gives 7 marbles to each of 4 friends: 7 × 4 = 28 marbles given away.
3. Remaining marbles: 45 − 28 = 17 marbles.
Approach 2: Sequential Giving Method
1. Start with 45 marbles.
2. After giving to the first friend: 45 − 7 = 38 marbles left.
3. After second friend: 38 − 7 = 31 marbles left.
4. After third friend: 31 − 7 = 24 marbles left.
5. After fourth friend: 24 − 7 = 17 marbles left.
Approach 3: Algebraic Method
Let x represent the marbles Liam has left.
1. Liam starts with 45 marbles.
2. Total given: 7 × 4 = 28.
3. Equation: 45 − 28 = x.
4. Solve for x: x = 17.
Approach 4: Estimation and Adjustment
1. Rough estimate: 7 is close to 10, so giving 10 marbles to 4 friends would be 40 marbles (overestimate).
2. Adjust: 40 − (3 × 4) = 28 marbles actually given.
3. Subtract 28 from 45: 45 − 28 = 17 marbles left.
Answer Evaluation:
All four methods result in 17 marbles remaining.
Conclusion:
The most frequent and correct answer is 17 marbles. Each method, whether direct calculation, step-by-step subtraction, algebraic reasoning, or estimation, correctly accounts for the 28 marbles Liam gave away. Therefore, 17 marbles is the final and accurate answer.
```
Our coding tutorial shows you how to construct both a basic version of the [self-consistency prompt](/docs/v1/guides/prompt-engineering/chaining-based/self-consistency), as well as using automated answer extraction.
## Why Prompts Alone Aren’t Enough
When people hear "advanced prompt engineering," they usually think of techniques that we just described above, like Chain of Thought, Self-Ask, and so on. And to be fair, these advanced prompting techniques are way better than just firing off a one-shot prompt and crossing your fingers.
**But real prompt engineering isn’t *just* about learning a few clever tactics**. It’s about managing the process like a serious engineering problem grounded in [prompt engineering best practices](/blog/prompt-engineering-best-practices/). Knowledge prompting techniques are just the starting point: they’re hypotheses, not guarantees. Every time you try a new prompting method, you’re running an experiment to see if it improves your outputs across different tasks.
And if you’re running experiments, you need an experiment framework because the **same prompt can produce different outputs each time**. You can’t just "try a new technique" and eyeball a few good answers. You need to measure whether you’re actually making things better, or just getting lucky.
The real goal of prompt engineering is to optimize your model's outputs across repeated, real-world inputs, like those required for production-grade [LLM applications](/blog/llm-applications/). Not just once, but consistently. To do that at scale, you need a system that versions your prompts, tracks every change, and ties every output back to its exact input, code, and model settings.
**That’s why we built [Lilypad](https://lilypad.so/docs)** to treat your prompts, and the full context around them, as versioned, traceable units so that prompt engineering becomes more like professional software development.
To use Lilypad, we advocate encapsulating calls in functions as a first step so that each LLM interaction can be versioned, traced, evaluated, and optimized independently, giving you full control over how prompts evolve and how your system improves over time.
Next, you simply add the `@lilypad.trace` decorator to turn the function into a managed prompt. This allows Lilypad to automatically version all changes made within the function closure, i.e., the prompt itself, model settings, input arguments, any pre-processing code, etc.
```py
from openai import OpenAI
import lilypad
lilypad.configure()
client = OpenAI()
@lilypad.trace(versioning="automatic") # [!code highlight]
def answer_question(question: str) -> str:
completion = client.chat.completions.create(
model="gpt-4o",
messages=[{"role": "user", "content": question}],
)
return str(completion.choices[0].message.content)
response = answer_question("What is the largest planet in the solar system?")
print(response)
# > The largest planet in the solar system is Jupiter.
```
Versioning the full function closure means you can:
* Reproduce exactly what happened during any model call
* Compare different versions of your function and outputs with full confidence
* Understand how changes to the prompt, code, or model settings impact the results
* Roll back safely if a change causes regressions or unexpected behavior
All of this brings real structure to the prompt engineering process, making it possible to trace every change, label failures clearly, and improve systematically, instead of flying blind.
Lilypad displays all versions and traces in its playground environment (described below), which is a no-code user interface where SMEs can experiment with different prompts and settings, and where you can easily visualize how different versions perform.
For example, for every LLM call we make, that versioned code appears in the playground:
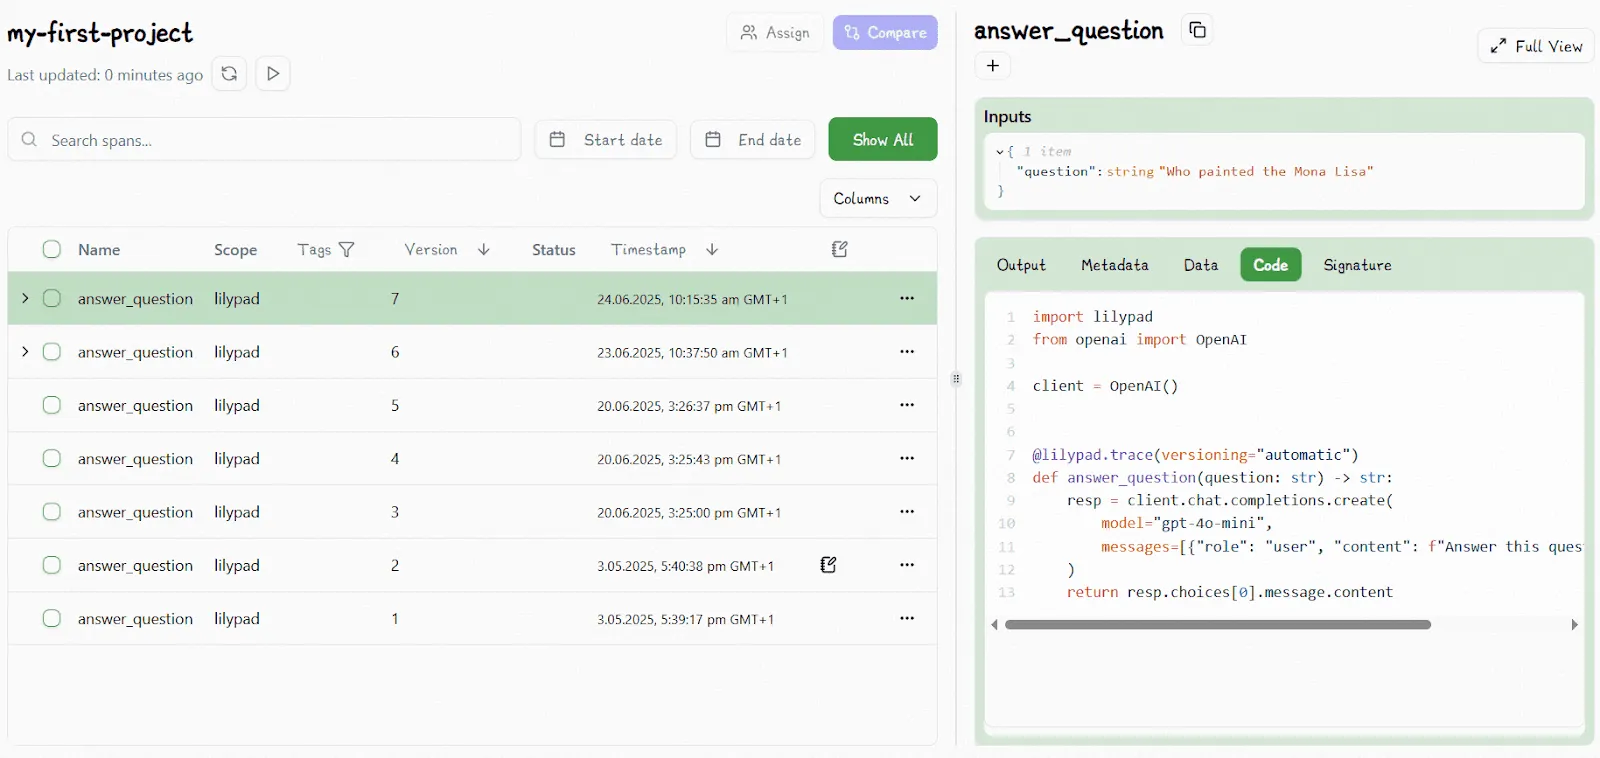
Changing anything within the function closure (including the prompt text) and running the code will automatically increment the version number, unless that change is identical to a previous version.
Lilypad traces not just the raw API request to the model, capturing input/output tokens, costs, and model metadata (which is key for doing [LLM evaluation](/blog/llm-evaluation/)), but also the full function that generated the call, including the code, prompt logic, arguments, and version.
You’re not just saving outputs; you’re building a complete history of how your prompts and the artificial intelligence behaves. This lets you spot bugs faster, track down unexpected costs, compare versions, and make real improvements based on data, not guesswork. It turns prompt engineering into something you can test, trust, and scale like real software, not just hope for the best.
## How Lilypad Makes Prompt Collaboration Actually Work
A lot of prompt observability platforms, like LangSmith or Langfuse Prompt Manager, completely separate prompts from the codebase. On paper, this sounds great: prompts on one side, code on the other, each managed by different teams.
But in practice, **we’ve found this setup fragile, error-prone, and hard to scale**. Once you break the link between prompts and the code that influences them, it becomes easy for things to drift out of sync, leading to confusing bugs and messy failures when changes happen.
In Lilypad, we take a different approach: we treat the prompt and the code as a single, versioned unit. Every time you update your [LLM prompt](/blog/llm-prompt/) or the function around it, Lilypad automatically keeps them in lockstep. The type-safe code generated in the playground always matches what’s running in production, no gaps, no surprises. And even if Lilypad’s servers went down, your local project stays fully intact.
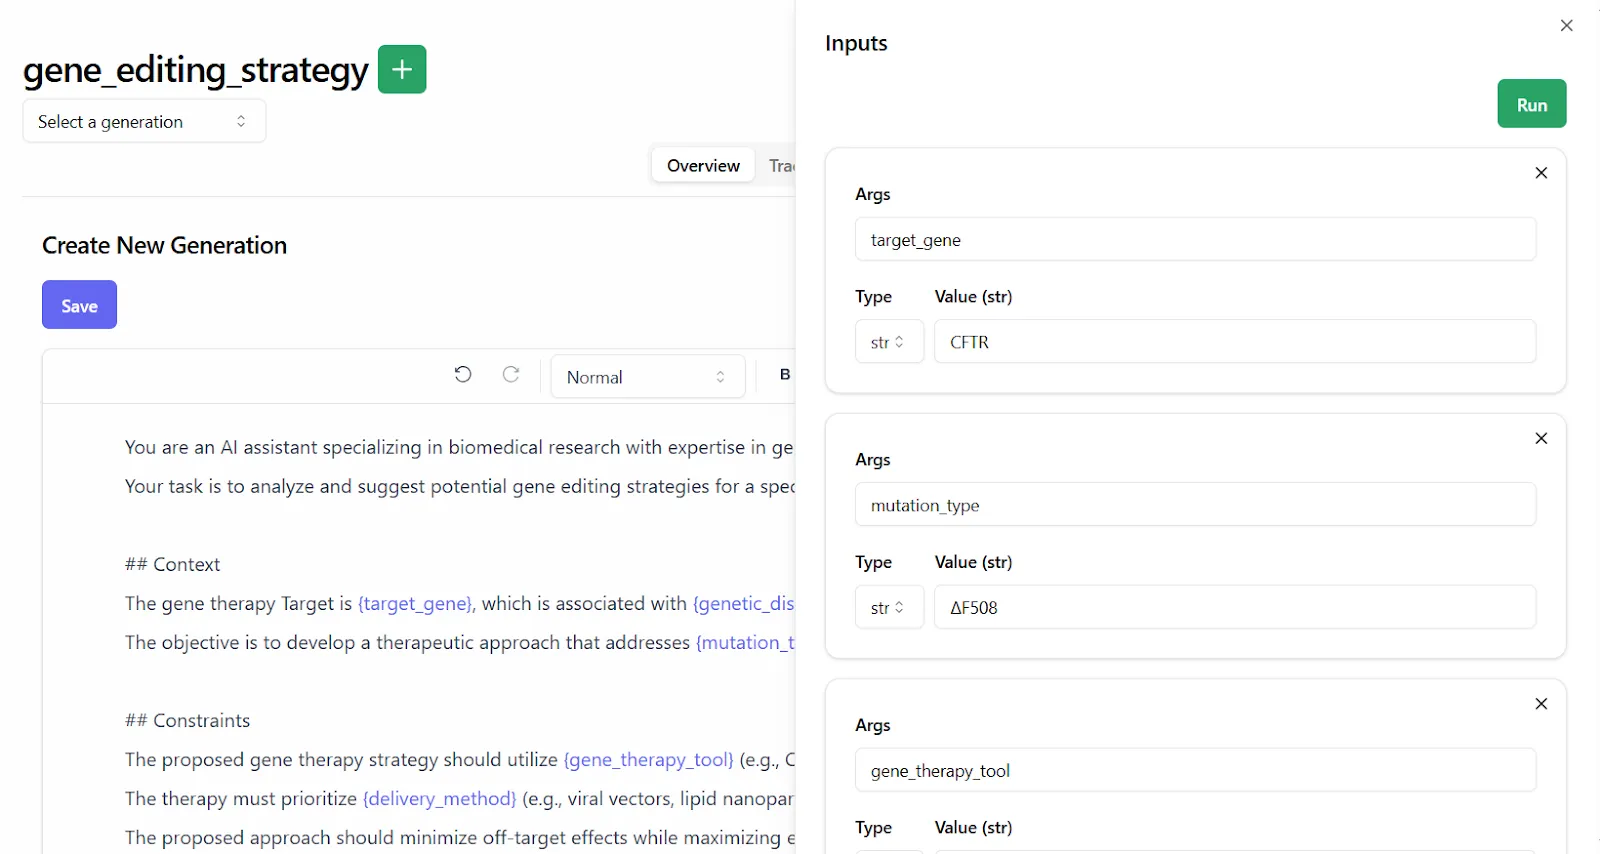
Nonetheless, we still offer the playground as a separate, no-code environment where non-technical domain experts can safely create, modify, and manage prompts, without developers needing to redeploy code.
This setup reduces risk: no random bugs from redeployments, no dependency drift, no config mismatches.
Inside the playground, domain experts have everything they need, from type-safe variable inputs to real-time model feedback, along with full metadata like token usage, cost, provider, model, and temperature settings.
Experts can use the markdown-supported prompt templates to try different prompting techniques and compare outputs as often as needed, all without having to manually save effective prompts or risk breakage by inadvertently changing application logic.
## Stop Guessing, Start Testing Your Prompts
If you’re not doing evals, it’s not really prompt engineering. You’re just guessing.
Testing and [prompt evaluation](/blog/prompt-evaluation/) are how you know if your prompts are actually getting better. The tricky part is that LLM outputs aren’t always black and white. They’re often fuzzy, and it’s not always obvious what counts as “right.”
Imagine you ask an AI model to extract the age from a user message: "I turned thirty-one just last week.”
The model might return "thirty-one" as a string, "The user is 31 years old," or simply 31\.
Technically, only the number 31 matches the exact instruction to "return a number," but all three answers are understandable.
This is where evaluation of generative AI responses gets tricky: without clear criteria, you could accidentally mark a useful answer as wrong, or pass something that technically doesn’t meet your needs.
We believe the best way to stay consistent is to use simple pass/fail judgments, backed by a short explanation when needed. Binary evaluations are easier to agree on among different people, unlike other criteria like scaled ratings (“rate on a scale from 1 to 5”), which can lead to inconsistent results.
That’s because different reviewers might see the scale differently: what feels like a "3" to one person could feel like a "4" to another. That kind of mismatch makes it harder to tell if a prompt is actually getting better or if people just see it differently. Pass/fail decisions are way clearer. They keep everyone on the same page and give you a much stronger way to judge whether your prompt changes are really working.
Also, if you successfully collect accurate evals over time, you can train large language models to introduce automation in evals later (using [LLM-as-a-judge](/blog/llm-as-judge/) for instance). This means you can start automating parts of the review process without losing the consistency and quality needed to keep improving your prompts (although we strongly recommend manually verifying all automated evals to catch errors, prevent drift, and avoid quietly shipping broken prompts).
Lilypad makes it easy for reviewers to quickly label outputs. Just pick a response in the playground, mark it pass or fail, and (if you want) add a quick note. Over time, you build up a clear record of what’s working and what’s not.
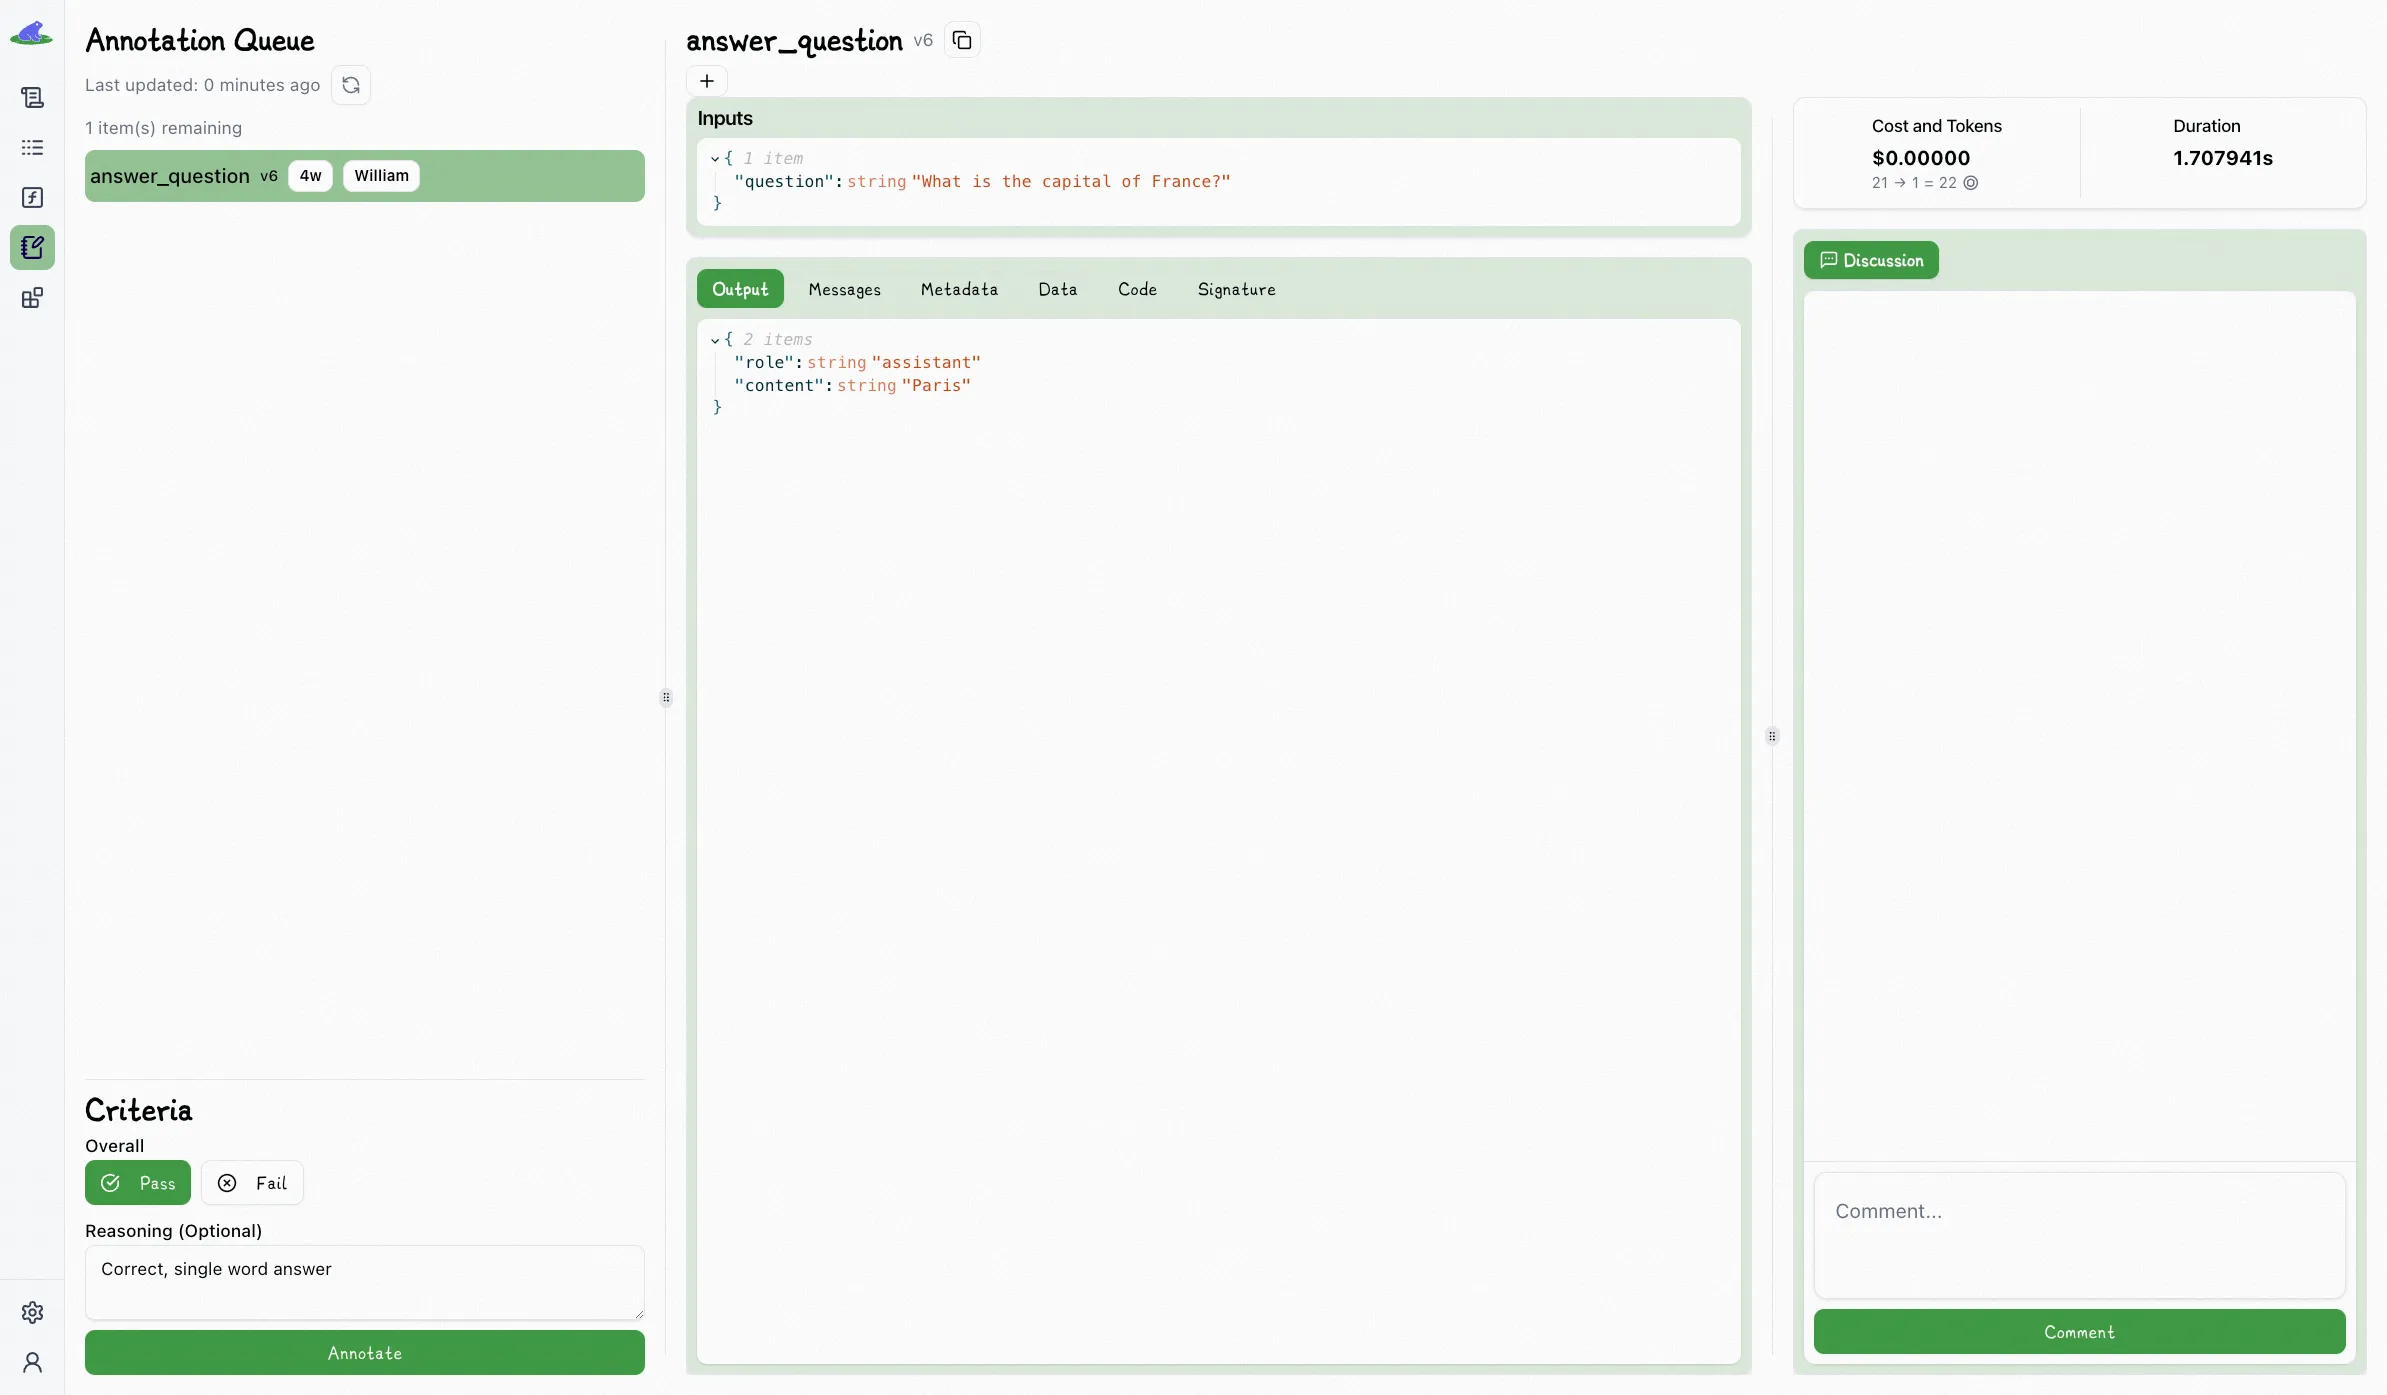
This simple process builds a ground truth dataset that can be compared against new outputs to see if things got better, worse, or stayed the same.
## Turn Prompt Engineering into a Repeatable Process
Lilypad lets you treat your prompts like real software: versioned, traceable, and always improving based on real feedback, not just intuition. It’s ideal for teams building and scaling [LLM agents](/blog/llm-agents/).
[To get started with Lilypad](https://lilypad.mirascope.com/), you can use your GitHub credentials to sign up and begin tracing and versioning your LLM functions with just a few lines of code.
A Guide to Advanced Prompt Engineering
2025-06-30 · 14 min read · By William Bakst